Good Reading

Well there were hoof prints in the potato patch this afternoon. But I don’t think it was javalina because nothing was rooted up and they were pretty big. So I have a feeling it was the deer that have been hanging around. It’s been really dry so I’m thinking that they are coming for water.

I might put a tub of water over across the creek for them or something, just to help keep them out of the yard.

In the meantime I’ve been having a wonderful read over at Gene Logsdon’s blog; awesome fella, I’ve been reading him almost as long as he’s been writing. Bought a few seeds the other day and cleaned out one of my seed boxes this afternoon. I really am trying not to go whole hog on the garden but my fingers are itching to be in the dirt.

So I planted about 3 luffa seeds, a few red sunflower seeds and some snapdragons. That shouldn’t get me into too much trouble. I planted them in some soil blocks and set them in the kitchen to keep the birds and chipmunks out of them while they sprout up.

Mule Deer

My Gardening Heroes; a Gardening Author Review

I just finished writing a review of what I consider to be the best 4 gardening authors of all time. These would be Gene Logsdon, Rosalind Creasy, Nancy Bubel and Elliot Coleman.

These four authors have done more to shape my thinking and my gardening than almost any others, except perhaps Jean Craighead George’s My Side of the Mountain and Living the Good Life by Helen and Scott Nearing. Perhaps I will write about them another day.

You can read my review at My Gardening Heroes

On another note, the potatoes are sprouting.

The potatoes are sprouting

What’s New

Well I haven’t been in here in awhile, lots of life happening around here. In the garden I have put in a small patch of lettuce mix which is almost ready to start eating and last week planted some carrot seeds. But I’ve been spending most of my time at my regular job, painting and working on a new project. That project is a store over at Zazzle.com.

Zazzle is a print on demand company where I can upload photographs of my art and they are printed on shirts, mugs, key chains, bags, literally thousands of products are available. Of course not everything looks good on every product, sometimes the shape of the art or photo doesn’t fit well on the printable area of the product. I’m still learning my way around over there but now have quite a few things up for you to look at, with more coming. So check it out, my zazzle.

And don’t forget, you can see my original artwork on my website, hysongdesigns. While you are there, be sure to sign up for my newsletter!

Finale’

Well here is “Yellow Iris”, all finished.

“Yellow Iris” is available. You can see more details at my new fine art website: http://maryhysong.fineartstudioonline.com/

More Art

Here is another painting I have been working on this week. This is 8.5×9.5 inch masonite panel. I am using Chroma’s Interactive acrylics. This is an acrylic paint that while it dries as fast as normal acrylics, I can rewet it and blend it even after it is touch dry. This means I can do some things similar to an oil painter. From a yellow Iris that grows in my garden.
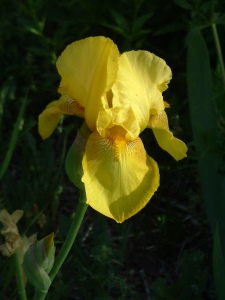
The reference photo; my granny grew these iris at her house on Gorden street and I brought some of them here.

Here is the ink drawing

Then I toned the board with raw sienna and painted in the darks with burnt umber

then I begin the grey layers. The grey layers help me get the colors right later.

Here the grey layers are complete. You can still see a little of the raw sienna and even the ink drawing peeping through here.  This is called the Flemish method, developed by the great master painters of the Renaissance.  You can learn more about this method and see it done in oil by Delmus Phelps at: http://www.easy-oil-painting-techniques.org/

Here I have just gone over the shadows with yellow ochre, see how the underpainting changes the colors of the layer on top giving a range of shades darker and lighter. This is not a physical mixing. Since this is an acrylic that can be rewet and worked longer I seal the under painting with a clear coat so there is no physical mixing with the color layers; just optical mixing.

Now I have added Naple’s Yellow to most of the lighter areas.
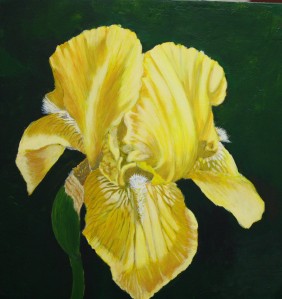
I have now done several more color layers, working back and forth with yellow ochre, Naple’s yellow, and Indian yellow, glazing each one in thin layers. Note how much the underpainting still affects the color layers.

more color layers, still working back and forth between the three yellows

Now, nearly finished, I’ve made some minor adjustments, like the beard on the center petal throws a cast shadow, which I’ve darkened a little to help the beard stand out more. (the beard is the fuzzy part on the petal, it’s actually the stamens, full of pollen)

I’ll be working on this a bit more today, adding some small highlights and such, but it’s about done.

Garden Art

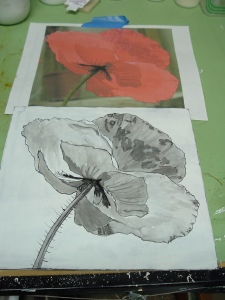
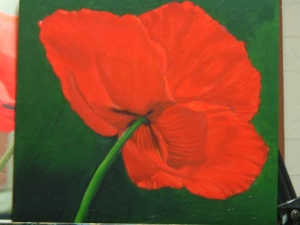
OK, this is probably not what you are thinking from the title, but I’m not changing it 😉 At the moment the garden is slipping a bit because I have been really concentrating on my next career: ART. So I thought you all might enjoy some of my paintings. I’m going to start off with a red poppy that grew in my garden this spring….    This is acrylic on gessoed masonite, 8.5×9.5 inches. Here is the ink drawing with the reference photo. Yeah, the perspective is skewed because it is laying down on the table.

A few layers of shading

The first few layers of color

several more layers and adjustments of the color  Almost finished!

I’m Baaack!

Boy it’s been a long time since I posted here. The dog attacks last fall really took the wind out of my sails. But spring has come and the flowers are blooming. I haven’t done a lot in the garden, but here are some catch up pictures for you.

Spring comes early, like January and February, starting with the Paperwhites.

Then the short bearded iris come on. I have solid white and a purple kind. I think of these as being the old-fashioned ones because they were here when I moved in. I see them all over town. They do so well that when they get over crowded and I have to divide them I have even put them up on the side of the hill and along the creek bank. They are good to help control erosion. As long as they are not in a real hot spot they can get along without extra water, though they will bloom more prolifically if they have some.

A painting I did from the above photo.

There are a few tulips around the yard. [Did you know you can eat tulip flowers?]

Some California poppies. These bloom all along the highways and on the hills around here.

Later come the tall bearded iris. I don’t know the name of this variety either. This one grows about 3 1/2 feet tall with as many as 6 blooms to a stalk.

About the same time these tall yellow ones come along, tho they are not quite as tall as the ones above.

Over on the hillsides the cactus are blooming; this one is called a hedgehog. The photo does not really give you the true color; it is much more intense, nearly fluorescent.

Here is a yucca blooming. They are related to our garden lilies. The Native Americans used this plant for making baskets and shoes. The would strip the fibers  off the leaves and the sharp points provided a ready-made needle. Also, they would watch the plants in early spring and when the bloom stalk started to swell up out of the plant they would cut the plant down and roast the middle of it in the embers of their fire. The plant stores up a lot of carbohydrate in preparation for blooming and setting seeds. When roasted those carbs turn to sugars and made a sweet treat.

Well that’s all for now. I’ll try to post some more later today or tomorrow.

Tractor Work

For more than a year we have worked towards putting culverts in the dry wash so we could drive over to the other side. That project got a big push in the right direction this weekend when our friend brought the backhoe in and started leveling the area on the other side.

gardenoctt09 014

gardenoctt09 016

Once all the tractor work is done and culverts are laid we’ll be able to work on some other projects, such as a work space, guest trailer, green house, gardens, animal pens.

Beans & More Beans

After waiting most of the summer for the beans to come in, they are here in abundance.

gardenoctt09 001As predicted, once the weather began to cool off those 11 foot tall Lima beans began setting pods.


gardenoctt09 007Hopi Purple Pod beans, a Native American variety, have set thick clusters of pods. I love this bean because it sets bunches of pods, I can fill the bowl in a few minutes, picking fistfuls of beans at a time. Picked really tiny you _can_ eat them as green beans, but they are at their best as green or dried shelled beans. They look a little like red pinto beans and have a full bodied meaty bean taste.

The Kentucky Wonder pole beans have come on strong too, with several pickings of 3-4 pounds of green beans, along with Pencil Pod Wax [a yellow bush bean] and Provider, a green bush bean available from www.freedomseeds.com

Tally HO!

I have joined up for Million Pound challenge, that is growing a million pounds of produce collectively, see http://www.freedomgardens.org for more information. Marche’s tally was 17.859 pounds of veggies, mostly mache, claytonia, kale, chard, chickweed, with a few carrots, beets and peas. Also 126 chicken eggs. whew, that’s a lot of eggs!

gardenapril09-003

Check out these little baby plums, mmm can’t wait for them to get big and juicy!

gardenapril09-018gardenapril09-021

who says veggies aren’t beautiful?! The pea flowers on the left are Dwarf Grey Sugar peas [like the flat pea pods in Chinese food] and the ones on the right are Blueshokkers, an heirloom blue/purple shelling pea, usually dried and used for soup I understand. This is my first time growing the shellers, so we’ll see!

gardenapril09-015

Under the lights, in 3/4″ soil blocks are eggplant and pepper seedlings. The group of eggplant seedlings in the back look like they have all germinated and are ready to move up into 2″ soil blocks. Soil blocks are pretty cool, you use a little tool to scoop up a peat & compost mix and press it into blocks, complete with indention in the top to take seeds. The 2″ blocks can be made with a hole that just takes the 3/4″ block, so ‘potting on’ is really easy, with no shock to the little plant.

gardenapril09-026

Here are some of those 70 some tomatoe plants that have been transplanted to larger pots and recycled containers. Yes, there are a couple of old ice chests and some plastic storage boxes that I’ve made into self watering containers as an experiment. Since we only get 12-18 inches of rain a year, and have been in a long term drought, anything to save water is good.

« Older entries